مشاوره رایگان

دریافت لینک های دانلود
دریافت پستی درب منزل
مبلغ کل:
تومان
جهت دریافت کد تخفیف به کانال تلگرام مراجعه و یا با پشتیبان آنلاین هماهنگ نمایید
Dependency Injection یا تزریق وابستگی ها در فریمورک Yii
DI مخفف dependency injection به معنای تزریق وابستگی است. DI یک شی است که می داند چگونه اشیاء را نمونه سازی و پیکربندی کند.فریمورک Yii ظرف یا container مربوط به DI را از طریق کلاس yii\di\Container فراهم می کند.
این کلاس DI های زیر را ساپورت می کند:
- Setter and property injection
- PHP callable injection
- Constructor injection
- Controller action injection
container مربوط به DI، constructor injection را با کمک type hint ها، پشتیبانی می کند :
class Object1 {
   public function __construct(Object2 $object2) {


   }
}
$object1 = $container->get('Object1');
// which is equivalent to the following:
$object2 = new Object2;
$object1 = new Object1($object2);
نوع Setter and property injection از طریق configuration زیر پشتیبانی می شود :
<?php
   use yii\base\Object;
   class MyObject extends Object {
      public $var1;
      private $_var2;
      public function getVar2() {
         return $this->_var2;
      }
      public function setVar2(MyObject2 $var2) {
         $this->_var2 = $var2;
      }
   }
   $container->get('MyObject', [], [
      'var1' => $container->get('MyOtherObject'),
      'var2' => $container->get('MyObject2'),
   ]);
?>
در مورد PHP callable injection، مخزن یا container برای ایجاد نمونه های جدید یک کلاس، از اضافه کردن به صورت callback استفاده می کند :
$container->set('Object1', function () {
   $object1 = new Object1(new Object2);
   return $object1;
});
$object1 = $container->get('Object1');
Controller action injection نوعی DI است که در آن dependency ها با استفاده ازtype hint معرفی می شوند. این کار برای نگهداری کنترلر های MVC مفید است :
public function actionSendToAdmin(EmailValidator $validator, $email) {
   if ($validator->validate($email)) {
      // sending email
   }
}
شما می توانید از متد yii\db\Container::set() برای ثبت dependency ها استفاده کنید :
<?php
   $container = new \yii\di\Container;
   // register a class name as is. This can be skipped.
   $container->set('yii\db\Connection');
   // register an alias name. You can use $container->get('MyObject')
   // to create an instance of Connection
   $container->set('MyObject', 'yii\db\Connection');
   // register an interface
   // When a class depends on the interface, the corresponding class
   // will be instantiated as the dependent object
   $container->set('yii\mail\MailInterface', 'yii\swiftmailer\Mailer');
   // register an alias name with class configuration
   // In this case, a "class" element is required to specify the class
   $container->set('db', [
      'class' => 'yii\db\Connection',
      'dsn' => 'mysql:host=127.0.0.1;dbname = helloworld',
      'username' => 'vladimir',
      'password' => '12345',
      'charset' => 'utf8',
   ]);
   // register a class with configuration. The configuration
   // will be applied when the class is instantiated by get()
   $container->set('yii\db\Connection', [
      'dsn' => 'mysql:host=127.0.0.1;dbname = helloworld',
      'username' => 'vladimir',
      'password' => '12345',
      'charset' => 'utf8',
   ]);
   // register a PHP callable
   // The callable will be executed each time when $container->get('db') is called
   $container->set('db', function ($container, $params, $config) {
      return new \yii\db\Connection($config);
   });
   // register a component instance
   // $container->get('pageCache') will return the same instance each time when it
      //is called
   $container->set('pageCache', new FileCache);
?>
استفاده از DI
مرحله 1 - داخل پوشه components یک فایل با نام MyInterface.php با کد زیر ایجاد کنید.
<?php
   namespace app\components;
   interface MyInterface {
      public function test();
   }
?>
مرحله 2 - در داخل پوشه components، دو فایل ایجاد کنید.
First.php −
<?php
   namespace app\components;
   use app\components\MyInterface;
   class First implements MyInterface {
      public function test() {
         echo "First class <br>";
      }
   }
?>
Second.php −
<?php
   app\components;
   use app\components\MyInterface;
      class Second implements MyInterface {
      public function test() {
         echo "Second class <br>";
      }
   }
?>
مرحله 3 - حال متد actionTestInterface را به SiteController اضافه کنید.
public function actionTestInterface() {
   $container = new \yii\di\Container();
   $container->set
      ("\app\components\MyInterface","\app\components\First");
   $obj = $container->get("\app\components\MyInterface");
   $obj->test(); // print "First class"
   $container->set
      ("\app\components\MyInterface","\app\components\Second");
   $obj = $container->get("\app\components\MyInterface");
   $obj->test(); // print "Second class"
}
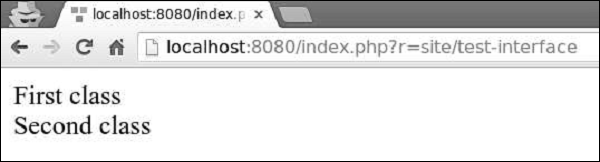
مرحله 4 – وارد مرورگر وب تان شوید و به آدرس http://localhost:8080/index.php?r=site/test-interface بروید، آنچه که مشاهده می کنید مطابق با تصویر زیر می باشد.
این رویکرد بسیار مناسب است، زیرا ما کلاس ها را در یک مکان قرار دهیم و دیگر کد ها، کلاس های جدید را به طور خودکار استفاده می کنند.

فصلِ:
14
,
تعداد قسمت ها:
188
,
سطح:
صفر تا صد
این فصل در یک نگاه:
…
سلام . پیشنهاد میکنم حتما دموی دوره رو مشاهده کنید درباره فریم ورک Yii: در پاسخ به سوالات : آیا این فریم ورک سریع است؟ آیا این یک فریم ورک امن است؟ آیا این یک فریم ورک حرفه ای است؟ آیا ا…
فصلِ:
8
,
تعداد قسمت ها:
77
,
سطح:
صفر تا صد
موضوعات:
آموزش PHP MVC
آموزش HTML5
آموزش CSS
آموزش JAVASCRIPT
آموزش JQUERY
آموزش PHP
آموزش Ajax
آموزش Yii
این فصل در یک نگاه:
…
پیشنهاد میکنیم دمو دوره رو حتما مشاهده کنید با سلام خدمت دوستان عزیز . ابتدا عرض کنم که این دوره برای دوستانی آماده شده که میخوان وب اپلیکیشن های مدرنی رو طراحی بکنن و وارد بازار کار ط…